Search This Blog

Showing posts with label End Table. Show all posts

Sunday, July 14, 2013

had some motivation

Since we've moved in, half of our living room has held my junk. I promised my husband only one project at at time, but that was apparently a lie. And then, the projects set...and set...and set. The pile was not my happy place, coming home was starting to get irritating because its so cramped! 

Talking about irritating, I have poison ivy. The worst spots are on my right arm and they've gotten to that won't stop oozing stage, in addition to being obnoxiously itchy. Random spots on my legs and left arm are itchy as well. To top that off, pretty sure I have about twenty mosquito bites as well.


So today, to get my mind off of the poison ivy and to take back my happiness and sanity, I kicked my butt into gear to clear out that area a bit. Here's two projects that came of it...I was even able to sweep the floor after moving stuff around!

The side table was painted in Paint Couture British Grey. The dipped legs (that are actually painted on) are in French Polynesian Pink. The table was sealed with Paint Couture Flat Finish. For those that haven't heard, Paint Couture is a new acrylic paint that requires no sanding - the paint adheres to almost any surface!

The lamp was originally this awful cream colored base. I painted over that with Annie Sloan Old White and went over it with Minwax dark wax after it was dry. The piece was sealed with Paint Couture Flat Finish. The shade was originally this awful olive color. After ripping that off I tied burlap ribbon and ripped pieces of vintage ticking around the frame.

So all in all, today I was motivated to work! What motivates you to get some projects done?


Sharing at:

Miss Mustard Seed

Thursday, February 21, 2013

lovely, little green

Hello! So, some exciting news - we bought a truck and we are moving! I'm probably a little too excited on the moving, as we haven't even signed the lease, but it has hardwood floors and a fenced yard for the dogs!! I will be blogging more on this later!

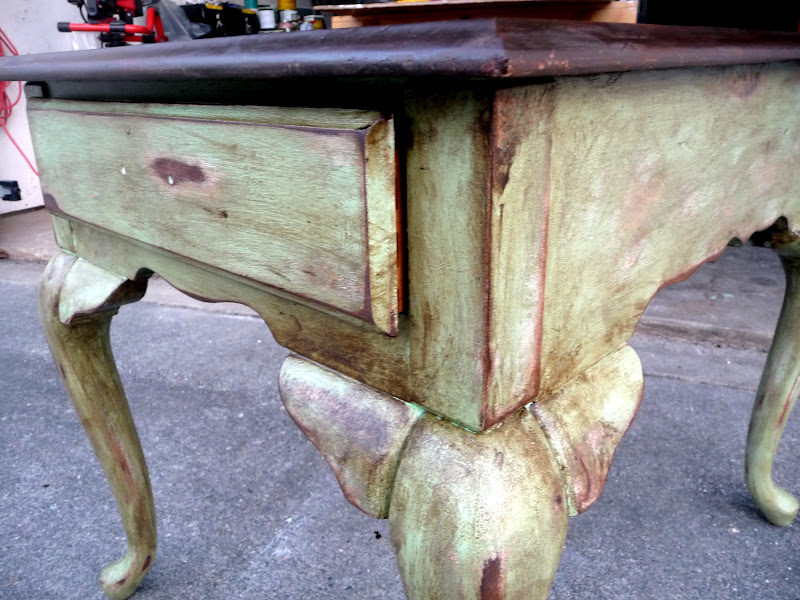
Tonight, I have this lovely, little green thing to share with you!

I bought this piece at a yard sale this past summer. During my stripping attempt, I realized the top was plastic laminate - lame!


But, during my night time blog reading, I learned a great trick from Storywood Designs about painting beautiful tops on furniture. Please check out her blog to learn!


I differed a little bit from what she shares. I used a 50 cent brown oops paint from Lowe's. The color reminds me of the Hershey's Cocoa powder you can buy at the stores. Like Storywood Designs, I stained with Minwax Dark Walnut. I also did this to the inside of the drawers as they were just kind of yuck looking - crayon stains, water stains, etc.


This was also my first attempt with milk paint and I love it! Color is Miss Mustard Seed Luckett's Green. I used the bonding agent as I was not going for a chippy effect. I did prime beforehand with my brown tinted primer, but you can't really tell a difference anyway. I coated the piece with Minwax Dark Wax and sealed it with water based polycrylic. Like Storywood Designs, I'm kind of in love too!


What piece have you just finished up?

Friday, January 18, 2013

I need your help!!

 
A few years ago I was lucky enough to pull out this piece of furniture from a barn - for $3!! The only problem was the top wasn't attached, and it was a terrible color of pink. Just terrible. But, I thought I'd paint it and make it into a cute bedside table.


I'm sure that was about 3 years ago, and until a few days ago it still was that terrible shade of pink. 

To give you some background, as much as I love painting furniture, there is only one piece that is painted in my house, and I didn't do it. My style is changing from dark primitive colors. My goal is to end up with a mixture of white, wood, and rust (and some color mixed it - like red in the kitchen).

So, after attempting to strip the paint off, I decided there was no use. The top of this furniture is NOT wood,  but instead plastic veneer (is that what's its called, I don't know...) Anyways, its hideously white and I hate it because I really wanted to stain the top of this piece wood. So now I'm stuck.


I went ahead and painted the piece, but didn't like it. I really didn't like the distressing job I did and I thought maybe white isn't what this piece needs (and this is my favorite white paint, I'm so let down), so I painted some blue on it to see how that would look. And honestly, I don't think I like the blue either. Maybe it just needs to be a funky color, maybe that's what defines this piece. I have really been wanting to buy Ce Ce Caldwell's Destin Blue.


Then I thought, maybe I'll get rid of the real top and make a wood top. 


***And here's where I need your help! Let me know your input, blue or white (or a different color), chicken wire sides or the original sides (as seen on the pink piece), wood top or original top, or any other ideas that you think would make this piece amazing! 


My husband really misses his night stand, so I need to fix it soon.  Your opinion is so much appreciated!!


Sharing at:
Miss Mustard Seed
Homespun Happenings

Thursday, November 1, 2012

Yellow Fall Sidetable

Hello! I'm attempting to create a more "mature" look in my painted pieces. I think I achieved that with this one!


Of course, I almost forgot to take a before picture! It was late when I started working on this one, so below is what I got. After this, I went to sanding the top off. I didn't bother with legs, since I was using ASCP in Arles. I'm pretty sure I put about 3 coats on this before the table was yellow enough to satisfy me.


I then distressed around all the sharp edges and decorative parts of the leg. I stained the top using Cabot Dark Walnut Stain and used a cheap foam brush. Have you tried this yet? I used to use a rag for wax, but I'm never going back. You have so much control with a foam brush. I used the same brush to lightly apply the wax all over the yellow paint. And then, just because I love foam brushes so much now (Really, I am a HUGE fan, converted for life), I used a clean foam brush to apply Minwax Satin Polycrylic to the entire table. 


This one looks pretty in my apartment, but will be making its way to the booth soon! Thanks for checking it out! Have you got a special fall table?

 Linking up to:
At The Picket Fence 
Miss Mustard Seed


shabby creek cottage
vif187
Funky Junk's Saturday Nite Special

Saturday, October 20, 2012

Blue Over Brown - A Wax-Distressed Sidetable

My creativity is running low tonight - I couldn't come up with a better name for this piece other than Blue Over Brown. I think it's because I'm writing my post out of order. I usually edit my pictures first, copy them into the post, and then write. That way, I can look at them and know what I'm writing about. But, my trusty eye for editing pictures is out walking the dogs.


As usual, I forgot to take a true before picture. This was your standard wooden piece, with a glossy finish. It was a bargain at goodwill, because the drawer slide wasn't attached on the front end. I'm pretty sure they would have sold it for twice as much or more, had the drawer slide been in place. All I did was tack it down with a finishing nail and it was as good as new.


So, my first before picture is the brown base coat. I mixed Valspar (a brown color and I painted over the label for some reason and I can't find my sample card, so I can't tell you the name) with Zinnser Oil Based Primer. After letting that dry for about 2 hours and sanding it, I painted back over it with just the latex paint (no primer mixed in). This helped deepen the brown color since it was mixed with white previously which made it more creamy.

Next, I grabbed a candle from the Dollar Store and sliced out the wax with a knife. I've never tried the wax distressing technique, but I've read about it so much I had to try it! Honestly, I couldn't see where the wax was on the piece since it was clear and the paint was already kind of shiny. I just went with it, though and waxed to my hearts desire.


Then, came the coat of blue. (Valspar - Beach House  WV37008).  I used the dry brush technique, as I did on the Picket Fence and 30 Minute Chair. For this, you get a small tiny tiny amount of paint on the brush (you want your brush to stay dry, not be wet with paint). Move over the piece quickly, you can repeat over areas if you need to.


Paint dries quickly using this techniques, so I was able to take a rag and wipe off the wax almost immediately. I love the wax technique, I think the distressing looks pretty natural. I may have over distressed. Also, there were a few places that definitely looked like a finger had run across it. So, to fix the places that I didn't like where brown was showing, I dry brushed the blue back over.


I wasn't done there though. I wanted to give a shot at the painted drawers too, so after debating between the same blue or white, I painted the inside and outside of the drawer white. Mistake, it looked terrible. I painted back over the outside in the Beach House Blue, left the inside white, and the look was complete.


Final step, was to coat the piece in waterbased polycrylic. 


Recap
Primer - Zinnser Oil Based mixed with Brown Latex Paint
Base Coat - The Brown Latex Paint without Primer
Top Coat - Valspar Beach House (WV37008)
Distressing Technique - Candle Wax
Protective Coat - Minwax Waterbased Polycrylic 

Sharing at:
youaretalkingtoomuch.com 
Miss Mustard Seed 
savvysouthernstyle 
 
 
Funky Junk's Sat Nite Special
Homespun Happenings

Sunday, September 30, 2012

Saturday Pickin'


That's it. I've decided. I'd rather be a hoarder than own an antique booth. Look at this stuff - white, chippy, unique. I want it, I want it, I want it. Where do I put it - my apartment is full. Maybe I'm already a hoarder. I don't know, I just don't want to part with this stuff!


Sigh, I need a house!

Wednesday, September 26, 2012

Baby Blue


Well, I actually finished these Baby Blues awhile back - even before the green with envy side table. They've just been sitting on my work table in the garage. I think I'm in love with this set, I'm pretty sure its my favorite that I've done so far.


I grabbed this set at a yard sale. The wood is cherry. Have you ever sanded cherry? Well, it of course turns even more cherry. And even when you prime it, the red shows through the white. You can't hide it. I tell you what, even when you paint it, the red shows through the blue. And even when you cover the piece in dark wax, the red still shows through. But, to tell you the truth - I like it. It's me. I love red and blue, can't get enough.


The first time around, these babies look like leopards. The distressing was forced (David's words), but it did look terrible. So, I primed over those parts and repainted. I went for a lighter sanding on the table tops and heavier on the legs. Love it. Did I say that enough?


Speaking of baby blues and love, I'm also in love with this sweet song Scott Avett wrote for his daughter.


Sharing at:

The Brambleberry Cottage
Miss Mustard Seed


Homespun Happenings

Thursday, September 13, 2012

Green with Envy Sidetable

Well, here she is, number 7! And here's my first attempt at staging. Except that it's on my patio instead of inside - that's what only two windows in a living room will get you, along with the fast setting evening sun.


The picture below is the first "before" picture I remembered to take. The table had already been primed, I at least assume that's what was on it. But I didn't like the way it felt, it was just gross. So off it came with some 60 grit sandpaper and my orbital sander.


Getting into all the nooks and crannies without sanding too far down was a bit too hard. Still  learning here, but this is where I ended up. Next step was to tape off the top, since that was going to be stained instead of painted.


The first post I wrote was on choosing paint colors. Well, the name Katydid just caught my eye. Probably some complex with liking anything that sounds similar to me. But, Katydid did not look great on this piece of furniture. It's too bright. Is that because Fall is in the air and I'm craving dark warm colors? Maybe. But, this color just wasn't cutting it.


I stained the top in Cabot Dark Walnut wood stain, since that's what I had on hand. I think I let it sit for too long, but it ended up looking better on the end product. In this picture, it toned down the bottom color a bit, but still am not digging it at this point.


 Maybe distressing would help? I grabbed the orbital sander and stuck with the 60 grit for some heavy distressing. It just looks fake. Fake, fake, fake. This is really what my husband likes to tell me. It looks forced, like I'm trying to make it look old. Still learning.
 

 You can kind of see the primer through the distressing here.


Well in the end, I just rubbed heavy amounts of wood stain all over the side table, then rubbed some of the excess if it looked splotchy. I think it helped give it a mature, aged look. After everything dried, I went over the top with water-based polyurethane and over the bottom with Minwax clear wax. I'm happy with it!


I couldn't find the pull that came with the dresser. Did it even have one when I bought it? I don't know. None of the other pulls in the garage or house matched up to the holes. So, I had to just borrow some knobs from another piece. There they are, staring at you like headlights. The drawer and I will go to Lowe's tomorrow. I'm thinking bronze, something like the knobs.


So, below is the recap, beginning to end.


Table bottom
  • Paint - Valspar Signature Colors Katydid (CI240)
  • Distressing Technique - 60 grit sandpaper and Orbital Sander
  • Stain - Cabot Dark Walnut 
  • Wax - Minwax Clear Wax 


Table top
  • Stain - Cabot Dark Walnut 
  • Sealant - Rustoleum Waterbased Polyurethane

  What is your technique for changing a too bright paint color?

Sharing this on:

 Miss Mustard Seed's Furniture Feature Friday! 

Homespun Happenings