

The picture below is the first "before" picture I remembered to take. The table had already been primed, I at least assume that's what was on it. But I didn't like the way it felt, it was just gross. So off it came with some 60 grit sandpaper and my orbital sander.

Getting into all the nooks and crannies without sanding too far down was a bit too hard. Still learning here, but this is where I ended up. Next step was to tape off the top, since that was going to be stained instead of painted.

The first post I wrote was on choosing paint colors. Well, the name Katydid just caught my eye. Probably some complex with liking anything that sounds similar to me. But, Katydid did not look great on this piece of furniture. It's too bright. Is that because Fall is in the air and I'm craving dark warm colors? Maybe. But, this color just wasn't cutting it.

I stained the top in Cabot Dark Walnut wood stain, since that's what I had on hand. I think I let it sit for too long, but it ended up looking better on the end product. In this picture, it toned down the bottom color a bit, but still am not digging it at this point.

Maybe distressing would help? I grabbed the orbital sander and stuck with the 60 grit for some heavy distressing. It just looks fake. Fake, fake, fake. This is really what my husband likes to tell me. It looks forced, like I'm trying to make it look old. Still learning.

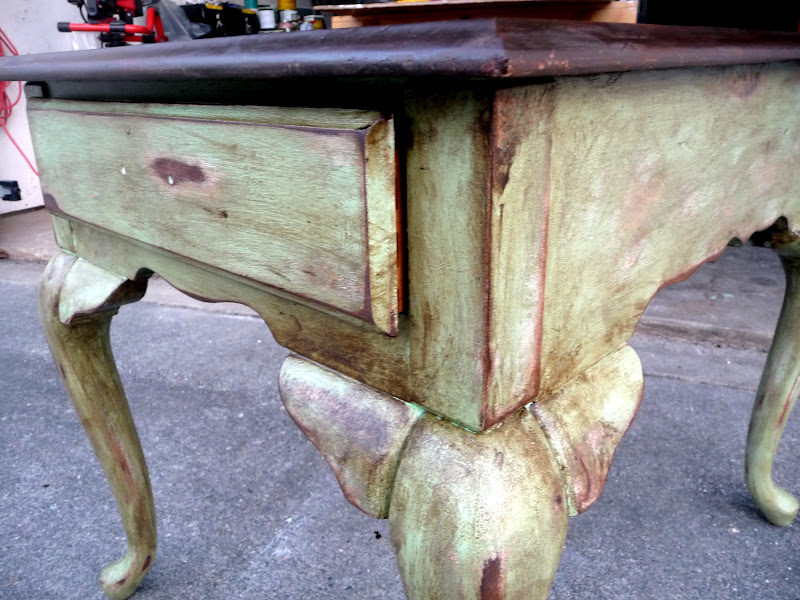
You can kind of see the primer through the distressing here.

.jpg)
Well in the end, I just rubbed heavy amounts of wood stain all over the side table, then rubbed some of the excess if it looked splotchy. I think it helped give it a mature, aged look. After everything dried, I went over the top with water-based polyurethane and over the bottom with Minwax clear wax. I'm happy with it!
I couldn't find the pull that came with the dresser. Did it even have one when I bought it? I don't know. None of the other pulls in the garage or house matched up to the holes. So, I had to just borrow some knobs from another piece. There they are, staring at you like headlights. The drawer and I will go to Lowe's tomorrow. I'm thinking bronze, something like the knobs.

So, below is the recap, beginning to end.

Table bottom
- Paint - Valspar Signature Colors Katydid (CI240)
- Distressing Technique - 60 grit sandpaper and Orbital Sander
- Stain - Cabot Dark Walnut
- Wax - Minwax Clear Wax
Table top
- Stain - Cabot Dark Walnut
- Sealant - Rustoleum Waterbased Polyurethane
What is your technique for changing a too bright paint color?
Sharing this on:
Miss Mustard Seed's Furniture Feature Friday!


Great finish! I agree that the katydid isn't too wonderful, but your darkening it with stain made it look really fantastic.
ReplyDeleteYour did a lovely job! It looks terrific! I would be delighted if your would link to Potpourri Friday, in progress!
ReplyDeleteStopping back by to say thank you for sharing your project at Potpourri Friday!
ReplyDeleteWow, so you didn't even change the paint color, you just stained it? It looks awesome! I would love for you to share this at my linky party that is live right now called Rustic Restorations Weekend. Newest follower :)
ReplyDeletehttp://homespunhappenings-tammy.blogspot.com/2012/09/rustic-restorations-weekend-20.html
Thanks so much for sharing this at Rustic Restorations Weekend!
DeleteVery pretty, you did a great job!
ReplyDeleteOMG - this turned out amazing! Looks like ANNIE SLOAN Versailles color1
ReplyDeleteBeautiful job -
Your newest follower - would love to have you come by for a visit and follow back when you have the time!
Hugs,
Suzan
I'm loving your little table. I didn't think the distressing looked forced, and at least your brave enough to distress it!
ReplyDeleteAmazing what the stain did to tone down the bright paint. I love this finished look. Bravo on working at it til it came out beautifully!
ReplyDeleteLiz
I forgot to say that I'm your new follower. I hope you'll stop over and follow as well if you like.
DeleteLiz
Awesome job! I love it!
ReplyDeleteSo cool, I always love looking at posts like these! Checkout my post if you get a chance, I just blogged about ways to wear sweaters for the early fall season. Follow if you like what you see, let me know what you think, as always. :)
ReplyDelete-Jenn
http://apopofstyle.blogspot.com/
WOW- the end result of your paint job is wonderful! Amazing how the distressing changed the tone of the piece. I'm still trying to perfect my painting techniques. I tend to like stain more so than dark waxing- seems as if I have more control. But I keep plugging along to try and perfect my skills. My garage is full of things to get started on! LOL.
ReplyDelete